• Modernizing SEO for React Portfolio Sites

    Dynamic Title and Meta Tags

    As a web developer, your portfolio site is often the first impression potential clients have of your work. But what good is a beautiful React portfolio if no one can find it? Recently, I upgraded my portfolio’s SEO implementation and learned some valuable lessons about dynamic meta tag management in client-side React applications.

    The Old Approach: Static HTML Limitations

    My original setup was basic:

    • Static index.html with generic meta tags
    • Same title and description for every page
    • No social media optimization
    • Limited search engine visibility

    This approach works for simple sites, but portfolio sites need page-specific SEO to properly showcase different sections like resume, projects, and services.

    React Helmet: The Deprecated Solution

    Initially, I considered React Helmet, the traditional go-to library for dynamic meta tags. However, research revealed it’s deprecated and no longer maintained. Many tutorials still recommend it without mentioning better alternatives exist.

    React 19 Document Metadata: Promising but Limited

    React 19 introduced native support for dynamic document metadata – the ability to render <title>, <meta>, and <link> tags anywhere in your component tree with React automatically hoisting them to the document head.

    The Problem: This feature requires server-side rendering to work in production. For client-side React apps, the meta tags remain in the component body instead of being moved to the document head, providing zero SEO benefit.

    The Real Solution: react-helmet-async

    For client-side React applications, react-helmet-async is the current best practice. It’s actively maintained and properly handles dynamic meta tags in production builds.

    Installation

    npm install react-helmet-async
    

    Note: If you’re using React 19, you may need to force install:

    npm install react-helmet-async --legacy-peer-deps
    

    Setup

    Wrap your app with the HelmetProvider:

    // main.tsx
    import {HelmetProvider} from 'react-helmet-async';
    
    createRoot(document.getElementById('root')!).render(
      <HelmetProvider>
        <App />
      </HelmetProvider>
    );
    

    Implementation

    Create a reusable SEO component:

    import {useLocation} from 'react-router-dom';
    import {Helmet} from 'react-helmet-async';
    
    const seoData = {
      '/': {
        title: 'Alan Werstler - Web Developer | Portfolio & Resume',
        description: 'Experienced React developer specializing in front-end development...',
        keywords: 'Alan Werstler, web developer, React developer, Seattle'
      },
      '/resume': {
        title: 'Resume - Alan Werstler | Web Developer',
        description: 'View my technical skills and professional experience...',
        keywords: 'Alan Werstler resume, web developer experience'
      }
      // Additional pages...
    };
    
    export function SEO() {
      const location = useLocation();
      const seo = seoData[location.pathname] || seoData['/'];
      
      return (
        <Helmet>
          <title>{seo.title}</title>
          <meta name="description" content={seo.description} />
          <meta name="keywords" content={seo.keywords} />
          
          {/* Open Graph for social sharing */}
          <meta property="og:title" content={seo.title} />
          <meta property="og:description" content={seo.description} />
          <meta property="og:url" content={`https://yourdomain.com${location.pathname}`} />
          
          {/* Structured data for search engines */}
          <script type="application/ld+json">
            {JSON.stringify({
              "@context": "https://schema.org",
              "@type": "Person",
              "name": "Your Name",
              "jobTitle": "Web Developer"
            })}
          </script>
        </Helmet>
      );
    }
    

    Add to your App component:

    function App() {
      return (
        <div>
          <SEO />
          <Routes>
            {/* your routes */}
          </Routes>
        </div>
      );
    }
    

    Troubleshooting: When Updates Don’t Work

    Some setups may experience issues where meta tags don’t update on route changes. If this happens, try forcing a re-render:

    import {useState, useEffect} from 'react';
    
    export function SEO() {
      const location = useLocation();
      const [key, setKey] = useState(0);
      
      useEffect(() => {
        setKey(prev => prev + 1);
      }, [location.pathname]);
    
      return (
        <Helmet key={key}>
          {/* your meta tags */}
        </Helmet>
      );
    }
    

    Comprehensive SEO Strategy

    The complete implementation includes:

    Dynamic Meta Tags

    • Route-specific titles and descriptions
    • Relevant keywords per page
    • Proper canonical URLs

    Social Media Optimization

    • Open Graph tags for Facebook/LinkedIn
    • Twitter Cards for rich previews
    • Professional profile images

    Structured Data

    • JSON-LD markup for search engines
    • Person/Organization schema
    • Local business data for geographic targeting

    Fallback Support

    • Enhanced index.html for JavaScript-disabled users
    • Progressive enhancement approach

    Enhanced index.html Fallbacks

    Keep comprehensive fallback meta tags in your public/index.html:

    <title>Your Name - Web Developer | Portfolio & Resume</title>
    <meta name="description" content="Fallback description for JavaScript-disabled users">
    <meta property="og:title" content="Your Portfolio">
    <meta property="og:description" content="Professional web developer portfolio">
    

    Results and Benefits

    After implementation:

    • Each page has targeted SEO metadata
    • Social sharing shows professional previews
    • Search engines properly index different sections
    • Better local SEO for geographic searches
    • Improved click-through rates from search results

    Key Takeaways

    1. Avoid React 19’s native metadata for client-side apps – it doesn’t work in production
    2. Use react-helmet-async as the current best practice
    3. Implement comprehensive fallbacks in your static HTML
    4. Test social sharing with Facebook/Twitter debugging tools
    5. Add structured data for rich search results
    6. Force re-renders if needed for problematic setups

    react-helmet-async Limitations

    While react-helmet-async works well, it has some limitations:

    • Still requires JavaScript execution (not ideal for all crawlers)
    • Social media scrapers may not execute JavaScript
    • Performance overhead from additional library
    • Potential synchronization issues in complex apps

    Alternative Approach: Per-Page Components

    For simple sites, consider placing Helmet directly in each page component:

    function HomePage() {
      return (
        <>
          <Helmet>
            <title>Home - Your Portfolio</title>
            <meta name="description" content="Welcome to my portfolio" />
          </Helmet>
          {/* page content */}
        </>
      );
    }
    

    This approach can be more reliable for route-based updates.

    Conclusion

    Dynamic SEO for client-side React applications requires careful tool selection. While React 19’s native document metadata looks promising, it’s only viable for SSR applications. For client-side portfolios, react-helmet-async remains the best solution, providing reliable meta tag management with proper fallback strategies.

    The investment in proper SEO implementation pays dividends in discoverability and professional presentation. Your portfolio represents your technical skills – make sure search engines and social media platforms can showcase it properly.


  • Building a Dynamic Art Portfolio: Technical Case Study of JoePinter.com

    One of my recent projects is a portfolio website for artist Joe Pinter, which can be viewed at https://joepinter.com/. While the site appears simple on the surface, its underlying architecture demonstrates how thoughtful technical decisions can create a scalable solution that translates well to many different website requirements. The public facing site includes an introductory home page, a gallery page with multiple filtering tools to help visitors find artwork that speaks to them, and shopping cart functionality that directs users to a contact page for artwork inquiries with the artist.

    Image of www.joepinter.com home page

    Technical Architecture & Planning

    The website development began with an outline that evolved into a comprehensive scope of work, wireframes, and close collaboration with the artist to define a well thought out solution for his specific requirements. The technical stack was carefully selected to balance performance, maintainability, and scalability: a React frontend for dynamic user interactions, a PHP backend for robust server-side processing, and a MySQL database for reliable data management. These planning documents were shared as static files that became the foundation of the site’s structure.

    Before the public site launched, a custom PHP CMS was built to enable the client to upload and manage image assets and metadata, track customer inquiries through reporting tools, and administer newsletter subscriptions. This custom CMS features a secure login page with encrypted authentication as the entry point, ensuring data protection and authorized access only.

    Image of a login page

    Content Management & SEO Optimization

    Once the client logs into their secure CMS, they gain access to comprehensive tools for building and monitoring the site’s performance. The Image Upload tool serves as the primary content management system where the client builds out the gallery page. The React powered gallery page at https://joepinter.com/gallery reads the metadata created through the CMS via API responses and dynamically populates the display.

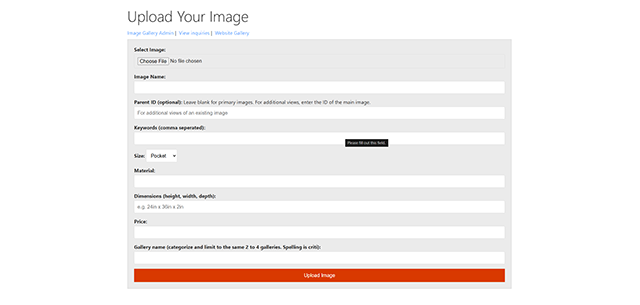
    Form fields allow for detailed cataloging including image name, keywords, size, material, dimensions, price, and gallery categories for robust searching and filtering capabilities. This metadata structure serves a dual purpose: it powers the frontend filtering system while simultaneously feeding search engines with rich, structured data. Each artwork page generates unique meta descriptions, title tags, and alt text, significantly improving the site’s SEO performance and helping potential collectors discover the artist’s work through organic search.

    Image of the CMS image uploader tool

    Gallery Management & Mobile Experience

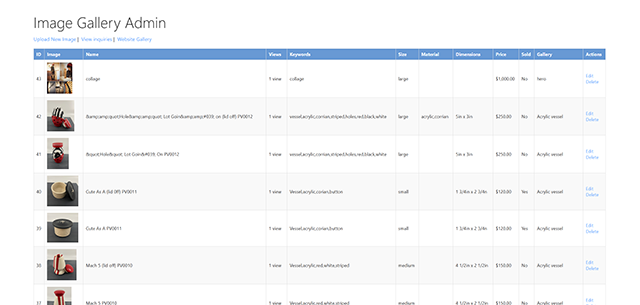
    The Image Gallery Admin tool provides a comprehensive overview of all uploaded images, displaying the metadata entered during upload while allowing for real time editing and image removal. Additional tracking columns, such as “sold” status, help monitor sales performance and inventory management.

    The entire system was built with mobile-first responsive design principles, ensuring that both the public gallery and admin interface function seamlessly across all devices. Given that many art collectors browse on tablets and smartphones, the touch friendly interface and optimized image loading ensure a smooth browsing experience regardless of screen size.

    Image of the CMS image Admin tool

    Customer Relationship Management

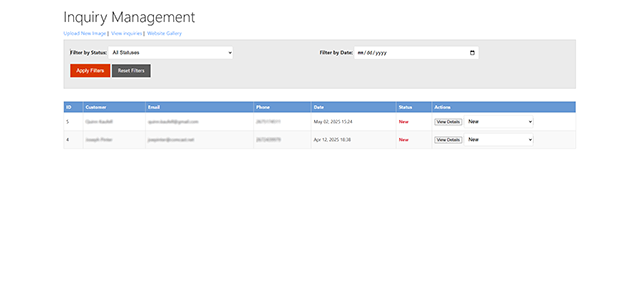
    The Inquiry Management tool enables comprehensive customer relationship management by allowing the artist to view and filter inquiries by date and status. Each inquiry displays complete customer details including name, email, phone number, subject, message, and the specific artwork of interest. The mobile responsive admin panel allows the artist to manage customer communications from anywhere, maintaining timely responses that are crucial in art sales.

    This personal approach allows the artist to maintain direct customer relationships, ensure artwork availability, handle commissioned pieces, and communicate upcoming gallery shows. While the system could potentially migrate to full e-commerce functionality, the current volume and inventory flexibility make this personalized approach ideal for maintaining the intimate customer experience that art buyers often prefer.

    Technical Performance & SEO Results

    The site’s technical architecture includes image optimization with automatic compression and lazy loading, ensuring fast page load times that improve both user experience and search engine rankings. The React frontend provides smooth filtering animations and seamless navigation, while the PHP backend delivers reliable API responses with efficient database queries.

    The combination of structured metadata, clean URLs, and responsive design has resulted in improved search visibility for the artist’s work. The dynamic gallery system automatically generates SEO friendly URLs for each piece, making individual artworks discoverable through image search and targeted keywords.

    Conclusion

    The custom CMS admin panel serves as the operational backbone of joepinter.com, transforming what appears to be a simple portfolio site into a comprehensive business management platform. Through the integrated upload tool, gallery management system, and inquiry tracking dashboard, the artist gains complete control over their digital presence while maintaining the personal touch that’s essential to art sales. The mobile-responsive design ensures accessibility across all devices, while the SEO-optimized architecture drives organic traffic and discovery.

    This backend infrastructure not only streamlines daily operations but also provides valuable business intelligence through reporting features that track customer engagement and sales performance. The result is a scalable, technically robust solution that grows with the artist’s needs whether that’s expanding inventory, transitioning to full e-commerce, or simply maintaining the current personalized sales approach that many art collectors prefer.

  • Let’s start with something simple – CSS variables

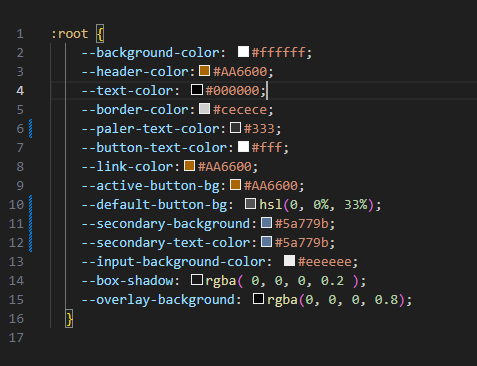
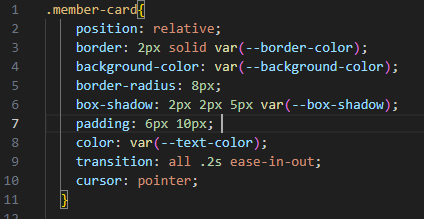
    Custom properties, sometimes referred to as CSS variables or cascading variables enable developers to reuse defined values in properties throughout the web application style sheet. The variables are defined in the :root style sheet and automatically inherited by the style sheets in the app. The variables are prepended with ‘–‘ like ‘–text-color’ and referenced like this in the style sheet: color: var(–text-color);

    Image of CSS root definition

    Most web sites, and even the most creatively designed websites, have a small palette of colors throughout the site. Making them predefined in what is almost like an index for the CSS makes it simple to reference and implement. Developers new to the code base and project do not need to go far to discover the colors needed to use.

    This approach simplifies updates during redesigns or when addressing color contrast issues for accessibility. By modifying the central “index,” developers can propagate changes across large websites effortlessly, reducing errors in managing colors across hundreds or thousands of lines of code.

    Image of CSS selector using CSS variables

    These variables are not limited to colors, but this is a great use case for custom properties. Font sizes and animations come to mind as other useful implementations.

    Example of responsive design with CSS variables:

    @media (min-width: 768px) { :root { –font-size: 18px; }}

    Define animation timing or easing functions for consistent, reusable animations:

    –animation-duration: 300ms; transition: all var(–animation-duration) ease-in-out;

    Include a fallback color for older browsers:

    color: var(–text-color, black);

    Custom properties worked well in the implimentation of a light mode/dark mode toggle button I added to the family tree website with React context. The button basically switched the chosen :root css for light or dark and changed the colors across all the components in the application.

    This is a fairly simple but useful demonstration of custom properties in CSS. If you want to learn more about CSS variables or custom properties visit: MDN Web Docs

  • Is this thing on?

    My first attempt at blogging was around the early 2010s where I began blogging about my cycling activity to help promote a Livestrong century challenge I was participating in and raising money for. The blog evolved in to my participation in local cyclocross races and long distance events and eventually covering hiking adventures and travel. The blog is still online after all these years and you could still be one of the first 20 people to ever see it at hawgfuel on blogspot.

    My blog posts here will be about topics in web development I find interesting to share, and will typically be about things I’m working on. The interest in the blog may not be much more than my outdoors blog in the past, but it will be a good place for me to consolidate some thoughts that may help lead to something bigger. Of course this will also allow me to experiment with Word Press to add to my experience with CMS software and provide examples on Guicoder as I have with a headless CMS for the family tree website.